As you may know, cheese is my favorite food group. Yes, I said food group. In my book it deserves its own group separate from dairy in which it can shine to all of its cheesy goodness potential.
At the farmer’s market this week, I got a little inspiration from the gal at the raw milk stand. I had always passed by and told myself that I should pick some up, but then I would get too engrossed in morels and squash blossoms that I would completely forget about it until I got home. This week I made sure to make it my first stop.
The first time I made mozzarella at home was a delicious disaster. It turned into a clumpy mess that was delectably rich and tasty, but it definitely looked nothing like mozzarella. This time around I wanted to use my newly acquired unpasteurized milk and see how that changed the batch of cheese. The results? Amazing.
Makes 1 large ball of mozzarella.

Ingredients:
- 1 gallon unpasteurized milk
- 1 1/2 tsp citric acid
- 1/4 tbsp renet
- 1 1/4 cup water
- 2 tsp salt
Kitchen Tools: large pot, slotted spoon, fine mesh strainer, thermometer, rubber gloves, cheesecloth (if you have it)
Prep Work:
Mix together the citric acid with 1 cup of water until it is fully dissolved. Mix rennet in a separate container with the remaining 1/4 cup water.
Cooking:
Pour all of the milk into your large pot and stir in the dissolved citric acid. Heat on medium heat, stirring slowly, until the milk reaches 90*F on your thermometer. Turn off the heat, then add in your rennet mixture. Stir a couple times with the slotted spoon to make sure it is fully incorporated, then let it sit undisturbed for 5 minutes.
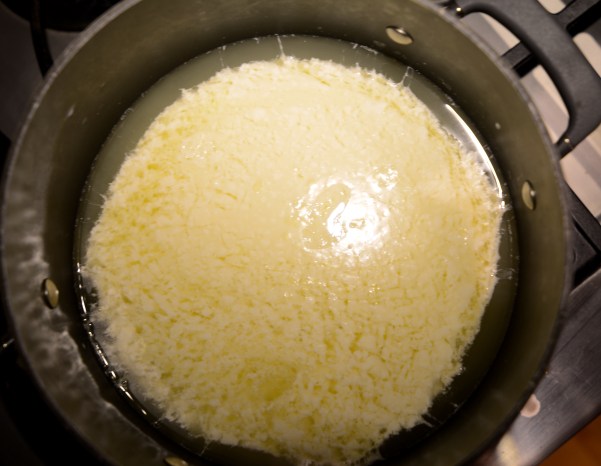
You’ll see that the curds have risen to the top and separated themselves from the whey.

The curds before cutting them into a grid
Use a long knife to slice the curds into about 2″ wide squares, making sure you get all the way to the bottom of the pot. You’re basically going to make it look like giant graph paper.
Turn the heat back up to medium and heat until the temperature of the curds & whey reaches 105*F, stirring gently so as not to break up the curds too much. Place cheesecloth or a double layer of paper towels over your mesh strainer and use the slotted spoon to spoon the curds into the strainer.

The curds right after they have been removed from the whey
Stir in the salt with a spoon and then let the curds drip over the whey for 10 minutes before proceeding. Squeeze as much liquid out of the curds as you can, then place them in a small bowl in the microwave for 30 seconds.
 Put on the rubber gloves and start massaging the curds together so that they create one large lumpy mass. Take the edges and tuck them underneath the ball you’re forming so that the top looks smooth and round.
Eat your cheese immediately or wrap it in plastic wrap and refrigerate.
Tips + Tricks:
*Make sure that you don’t exceed the recommended temperatures of the milk. You can easily overcook it and the curds won’t stick together. (Trust me, I’ve done it)
*If your cheese isn’t looking like you’re melting it on top of a pizza when you take it out of the microwave, nuke it in there for another 20 seconds then continue.
*There are a number of different ways to mold your cheese into a ball. I tend to knead it like bread for a bit then stretch the top out so it looks nice and round.
*I can’t stress enough how important it is to use raw or unpasteurized milk for this recipe. The results with regular milk are much harder to achieve and just don’t quite taste right.

